Author Archives: jamieangotti

Not-So-Cafeteria “Cafeteria Cookies”

Standard

When you hear the words “cafeteria” and “cookies” in the same sentence, most of us would probably cringe in fear.  When my sisters brought me this Pinterest pin begging for me to make them these “cafeteria cookies”, as they were calling them (they look like the cookies the school sells at lunch), I was skeptical.  But after a lot of reassurance from my sisters insisting if the cookies tasted anything like the ones they could buy from their school the recipe would be a keeper, I decided to go ahead and try it out. Luckily I had all the ingredients in my pantry, making the allure of the recipe even more inviting.  You can find the original pin and recipe here.

DSC01057

The recipe starts by preheating the oven to 350 degrees F and lining a baking sheet with parchment paper. In a large mixing bowl the butter and sugars were creamed until well combined.  Next the eggs and vanilla were added and mixed in.  Add in the flour, baking soda, salt and instant vanilla pudding mix. YES, I said dry instant vanilla pudding mix.  Odd right? Stir well to combine.  The recipe calls for Mini M&M candies and mini chocolate chips, but all I had in my pantry were regular sized semisweet chocolate chips and they worked fine.

After the dough was combined a medium sized cookie scoop was used to create round shaped dough balls on the baking sheet 1 inch apart.  The dough was then baked for 10 minutes.

DSC01067


DSC01072


I’m claiming this pin a success! These were the most amazing cookies I have ever eaten.  Not only were they chewy in the middle, they had a crunchy outer ring that provided the perfect crunch to offset the tender center. It must be the magical dry pudding mix that give these cookies their perfect composition.


The recipe took less than 30 minutes including cooking time (definitely the fastest batch of homemade chocolate chip cookies I’ve ever made). But, our batch did not yield two dozen cookies as the original recipe said; I’m thinking this is a good thing since the cookies were so delicious! These cookies are very Pinteresting! After trying out this pin I will never use my traditional chocolate chip cookie recipe again.

Next feat, ditching the chocolate chips and vanilla pudding, and adding almond extract, lemon instant pudding mix, and lemon zest for a summery take on these delicious treats.  Try this recipe, I promise you will not be disappointed!

Happy Pinning,


Lavishing Lavender Lotion Bars

Standard

Now that it’s summer, it seems like the season’s motto is, “the more skin the better”.  Living in Nevada, dry skin is inevitable, so I’m always searching for great moisturizers.  While looking through the Beauty section on Pinterest, I found a recipe for lotion bars and was instantly intrigued. I was lacking a few ingredients in my pantry, so I headed down to Whole Foods and picked up bee’s wax, lavender oil (the smell is intoxicating), and ½ vegetable ½ canola oil blend.  I already had a jar of coconut oil from when I was on my Paleo baking kick. The link to the original pin and full recipe can be found here.

The recipe called for equal amounts of each of the oils and bees wax.  I went with a 2oz to 2oz to 2oz. ratio. I didn’t want to make too of a batch and not like the end product. I placed 2 ounces of grated bee’s wax, 2 ounces of canola oil, and 2 ounces of coconut oil in a glass mixing bowl.  The glass bowl was then placed over a pot of boiling water (alternative double boiler set-ups).  The melting process was fairly quick, probably 12 minutes to completely melt the bee’s wax within the oils.

cimg2681

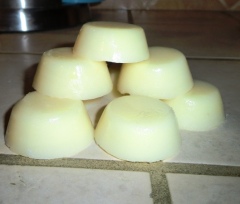
After the mixture was completely melted, the bowl was removed from heat and five drops of lavender oil was added (you can add as many drops of whatever scented oil you want).  After the lavender oil was added, the mixture was promptly poured into a canola spray greased mini muffin tin (I used a mini muffin tin for smaller lotion bars but any mold will work).

cimg2685

I then placed the muffin tin into the freezer, being I am the most impatient person in the world; I just couldn’t wait to try them!  After about 10 minutes I pulled the tin out of the freezer and used the miniature lotion bars starting with my arms. OH MY GOSH THEY WORK! Although a bit greasy at first, the end result was ultra-moisturized skin. The greasy feeling could have been a result of using a ½ vegetable oil ½ canola oil blend, but I can’t be sure. I wouldn’t suggest these for everyday use, but after a before-bed-shower using these handy lotion bars on especially dry areas, like feet and elbows, would greatly benefit your skin’s happiness.

cimg2687

cimg2688


I’m deeming this pin a success!  The smell, the moisturizing capabilities, and the ease of use are all great from this quick and simple Pinterest project.  As I stated before the only downside is the slight greasy feeling left over after use, but it soaks into the skin quickly and is unnoticeable after a few minutes.  Also, after making the lotion bars, they need to be kept in the refrigerator to minimize melting.


From start to finish this pin took me 45 minutes and made my entire house smell aromatically delicious!  These lotion bars are definitely Pinteresting.  Go grab your oils and bee’s wax and get moisturizing!


Happy Pinning,

Pinterest: The Good, the Bad, and the Just Plain Pretty

Standard

Albert Einstein once said, “The secret to creativity is knowing how to hide your source”.  For the purpose of this blog we’ll just forget about this quote.

At times we all have moments where creativity is just bubbling inside of us.  Last year while working in a kindergarten class I was introduced to Pinterest.com.  Those you who don’t know what Pinterest is, I highly suggest you quickly click over and get yourself an account (see I’m already giving away my secret sources).  You won’t regret it!  Here’s a quick summary of what Pinterest is all about.  Simply stated on their website, “Pinterest is a tool for collecting and organizing things you love”.  And when they say things, they should say anything and everything you love.  From recipes and DIY projects, to beauty products and methods to recipes for making homemade baby food, the purpose of Pinterest is a virtual idea board where you can pin your ideas by a category you specify yourself.

A screen shot of some of my Pinterest boards.

A screen shot of some of my Pinterest boards.

As I said, I have been a Pinterest member for at least a year now, and I definitely have Pinterest-itous.  I grew up with three younger sisters, a dad who was once a teacher (now a principal), and a mom who is also known as “MomGyver”.  My family is fairly gifted with the creative and DIY genes, and with four girls our house has an addiction to the color pink and sparkly bows.  So why blog about Pinterest? Well, after a few failed Pinterest projects (along with many successful masterpieces) it’s a running joke in my household that things on Pinterest can either be Pinteresting, or Pintrocities (i.e. the name of the blog!).  I want to use this blog to show how easy… or not so easy Pinterest projects can be.  While creating projects I have been meaning to try,  I hope to save you time on the not-so-great Pinterest projects while also encouraging you to re-create the projects I really liked doing. I love trying new things and letting the creative juices flow! With the help of my “handy dandy sisters”, as I call them, we’ll take you on a Pinterest journey through the good, the bad, and the just plain pretty.

Happy Pinning,